Pulled Pork Fat Cap Up Or Down: The Ultimate Guide To Perfectly Juicy And Flavorful Meat
Pulled pork is a beloved dish enjoyed by many, and one of the most debated topics among BBQ enthusiasts is whether the fat cap should be placed up or down when cooking. This question has sparked countless discussions, with pitmasters and home cooks passionately defending their preferred method. The fat cap plays a crucial role in the cooking process, and understanding its impact can elevate your pulled pork game to new heights. Whether you're a seasoned BBQ pro or a beginner eager to master the art of smoking meat, this guide will provide you with all the information you need to make an informed decision. From the science behind fat rendering to expert tips for achieving tender, juicy pulled pork, we’ll explore every angle of this topic.
When it comes to cooking pulled pork, the fat cap is more than just a layer of fat—it’s a key factor in flavor infusion and moisture retention. Placing the fat cap up or down can significantly affect the texture, juiciness, and overall taste of your meat. While some argue that the fat cap should face up to allow the fat to render down into the meat, others believe that placing it down creates a barrier between the heat source and the meat, resulting in a more evenly cooked dish. Understanding the nuances of this debate is essential for anyone looking to achieve BBQ perfection.
In this article, we’ll dive deep into the pros and cons of each method, provide scientific insights, and offer practical tips to help you decide which approach works best for your cooking style. By the end of this guide, you’ll have the knowledge and confidence to cook pulled pork that’s not only delicious but also perfectly suited to your preferences. Let’s get started!
Read also:Is Ines Rosales Married To Mike Woods Exploring Their Relationship
Table of Contents
Understanding the Fat Cap
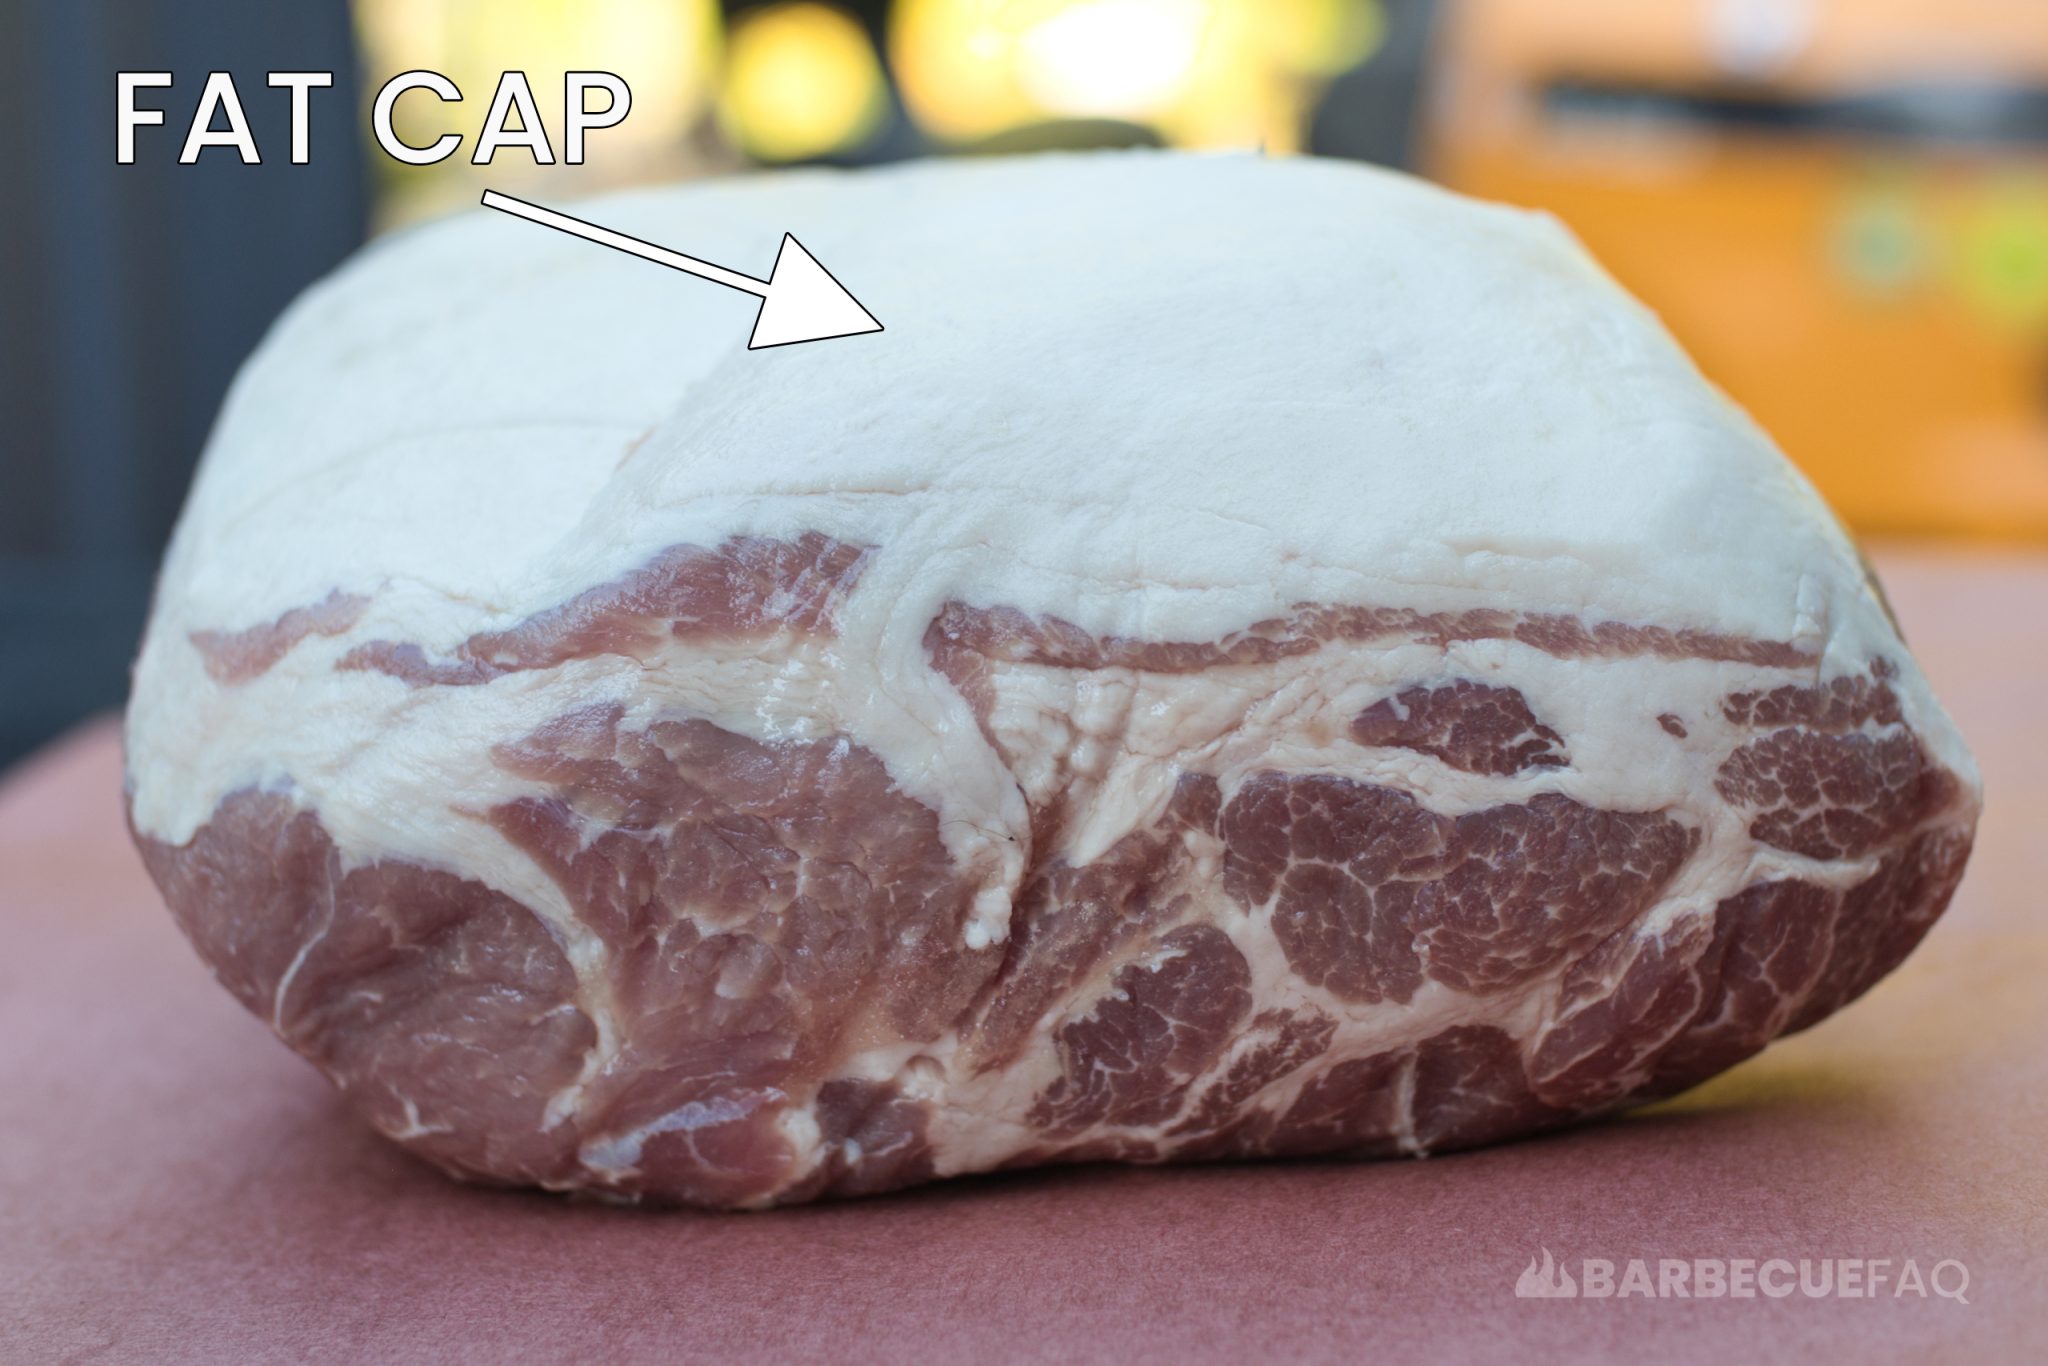
The fat cap is the layer of fat that naturally covers one side of a pork shoulder or pork butt. This layer serves multiple purposes during the cooking process. First, it acts as a protective barrier, shielding the meat from direct heat and preventing it from drying out. Second, as the fat renders, it releases flavorful juices that can enhance the taste and texture of the meat. Understanding the role of the fat cap is essential for making an informed decision about its placement.
When preparing pulled pork, you have two primary options for positioning the fat cap: placing it up or down. Each method has its advantages and disadvantages, depending on your cooking setup, personal preferences, and desired outcome. For example, placing the fat cap up may allow the fat to drip down into the meat, while placing it down can create a buffer between the heat source and the meat, promoting more even cooking.
What Happens When Fat Renders?
As the fat cap renders during cooking, it melts and releases moisture and flavor into the meat. This process is crucial for achieving tender, juicy pulled pork. However, the effectiveness of fat rendering depends on factors such as cooking temperature, duration, and the positioning of the fat cap. Understanding these variables can help you optimize your cooking method.
Fat Cap Up: The Pros and Cons
Placing the fat cap up is a popular choice among many BBQ enthusiasts. This method allows the fat to render down into the meat, theoretically enhancing its flavor and moisture content. However, there are both advantages and disadvantages to this approach.
Pros of Fat Cap Up
- Flavor Infusion: As the fat renders, it drips down into the meat, adding depth and richness to the flavor.
- Moisture Retention: The rendered fat helps keep the meat juicy, especially during long cooking sessions.
- Even Browning: Placing the fat cap up can result in a beautifully caramelized crust on the surface of the meat.
Cons of Fat Cap Up
- Uneven Heat Distribution: The fat cap can create a barrier that prevents heat from penetrating the meat evenly.
- Excess Fat: If not rendered properly, the fat cap may leave behind an undesirable layer of unrendered fat.
- Smoke Penetration: The fat cap can block smoke from reaching the meat, potentially reducing the smoky flavor.
Fat Cap Down: The Pros and Cons
Alternatively, placing the fat cap down has its own set of benefits and drawbacks. This method is often preferred by those who prioritize even cooking and heat distribution.
Pros of Fat Cap Down
- Heat Protection: The fat cap acts as a shield, protecting the meat from direct heat and preventing it from drying out.
- Even Cooking: Placing the fat cap down promotes more uniform heat distribution, resulting in consistently cooked meat.
- Smoke Penetration: With the fat cap down, smoke can more easily reach the surface of the meat, enhancing its flavor.
Cons of Fat Cap Down
- Less Flavor Infusion: The rendered fat may drip away from the meat, reducing its potential to enhance flavor.
- Moisture Loss: Without the fat cap acting as a reservoir, the meat may lose moisture more quickly.
- Browning Challenges: Achieving a caramelized crust may be more difficult with the fat cap facing down.
The Science Behind Fat Rendering
To truly understand the impact of the fat cap’s placement, it’s important to delve into the science of fat rendering. Fat rendering occurs when the fat melts due to heat exposure, releasing its liquid components. This process is influenced by factors such as cooking temperature, duration, and the type of fat present in the cap.
Read also:Everything You Need To Know About Rulz 2024 Download
For example, pork fat typically begins to render at temperatures around 130°F (54°C). As the temperature increases, more fat melts, contributing to the meat’s juiciness and flavor. However, if the temperature is too high, the fat may render too quickly, leading to dryness. Conversely, if the temperature is too low, the fat may not render fully, leaving behind an undesirable layer.
How Heat Affects Fat Rendering
The direction of heat flow plays a significant role in fat rendering. When the fat cap is placed up, the heat travels downward, causing the fat to drip into the meat. In contrast, when the fat cap is placed down, the heat travels upward, potentially rendering the fat away from the meat. Understanding this dynamic can help you choose the best method for your cooking setup.
Expert Tips for Perfect Pulled Pork
Achieving perfectly juicy and flavorful pulled pork requires more than just deciding whether to place the fat cap up or down. Here are some expert tips to help you elevate your BBQ game:
Seasoning and Rubs
- Use a balanced dry rub with a mix of salt, sugar, and spices to enhance the meat’s natural flavors.
- Apply the rub generously and let the meat sit for at least an hour to allow the flavors to penetrate.
Cooking Temperature
- Maintain a consistent smoker temperature between 225°F and 250°F (107°C to 121°C) for optimal results.
- Use a meat thermometer to monitor the internal temperature, aiming for 195°F to 205°F (90°C to 96°C) for tender pulled pork.
Common Mistakes to Avoid
Even experienced cooks can make mistakes when preparing pulled pork. Here are some common pitfalls to watch out for:
- Overcooking: Cooking the meat for too long can result in dry, tough pulled pork.
- Underseasoning: Failing to season the meat adequately can leave it bland and uninspired.
- Ignoring Resting Time: Skipping the resting period can prevent the juices from redistributing, leading to dry meat.
Tools and Equipment for BBQ Success
Having the right tools and equipment is essential for achieving BBQ success. Here are some must-have items:
- Smoker: Invest in a high-quality smoker to ensure consistent heat and smoke distribution.
- Meat Thermometer: A reliable thermometer is crucial for monitoring the internal temperature of the meat.
- Heat-Resistant Gloves: Protect your hands while handling hot equipment and meat.
Choosing the Right Cut of Meat
The cut of meat you choose can significantly impact the flavor and texture of your pulled pork. Pork shoulder and pork butt are the most popular choices, each offering unique characteristics.
Pork Shoulder vs. Pork Butt
- Pork Shoulder: Contains more connective tissue, resulting in richer flavor and juiciness.
- Pork Butt: Offers a balance of fat and meat, making it ideal for beginners.
Serving and Pairing Pulled Pork
Once your pulled pork is ready, it’s time to serve and enjoy it. Here are some ideas for serving and pairing:
- Classic Sandwich: Serve the pulled pork on a soft bun with coleslaw and BBQ sauce.
- Tacos: Use the pulled pork as a filling for tacos, topped with fresh salsa and avocado.
- Salad: Add pulled pork to a salad for a hearty and flavorful meal.
Conclusion
Deciding whether to place the fat cap up or down when cooking pulled pork is a personal choice that depends on your preferences and cooking setup. By understanding the pros and cons of each method, as well as the science behind fat rendering, you can make an informed decision that suits your needs. Whether you’re aiming for maximum flavor infusion, even cooking, or a perfect crust, this guide has provided you with the tools and knowledge to achieve BBQ success.
We hope this article has been helpful in your quest for the perfect pulled pork. If you found this guide useful, feel free to share it with fellow BBQ enthusiasts or leave a comment with your thoughts. For more tips and recipes, be sure to explore our other articles on smoking and grilling. Happy cooking!