Classic Lash Set Mapping: The Ultimate Guide To Perfect Eyelash Extensions
Classic lash set mapping is an essential technique for anyone looking to achieve flawless eyelash extensions. Whether you're a professional lash artist or a beginner, understanding this method will help you create stunning, customized looks for your clients. The key to successful lash mapping lies in precision, balance, and understanding the unique eye shape of each individual. This comprehensive guide will walk you through everything you need to know about classic lash set mapping, from the basics to advanced techniques, ensuring you can deliver exceptional results every time.
Classic lash set mapping is not just about applying lashes randomly; it's a systematic approach to designing a lash set that complements the client's natural features. By mastering this technique, you can enhance the beauty of the eyes, create symmetry, and ensure the lashes look natural and balanced. Whether you're aiming for a dramatic or subtle look, lash mapping is the foundation of a successful lash application process.
In this article, we will explore the importance of classic lash set mapping, step-by-step instructions, tips for beginners, and advanced techniques for professionals. You'll also learn about tools, products, and best practices to ensure your lash mapping process is efficient and effective. Let's dive into the world of classic lash set mapping and discover how you can elevate your lash artistry skills.
Read also:Unveiling The Secrets Of El Patron Original Video A Comprehensive Guide
Table of Contents
- What is Classic Lash Set Mapping?
- Why Lash Mapping Matters
- Tools and Products for Lash Mapping
- Step-by-Step Lash Mapping Process
- Tips for Beginners
- Advanced Techniques for Professionals
- Common Mistakes to Avoid
- Maintaining Lash Extensions
- Conclusion
What is Classic Lash Set Mapping?
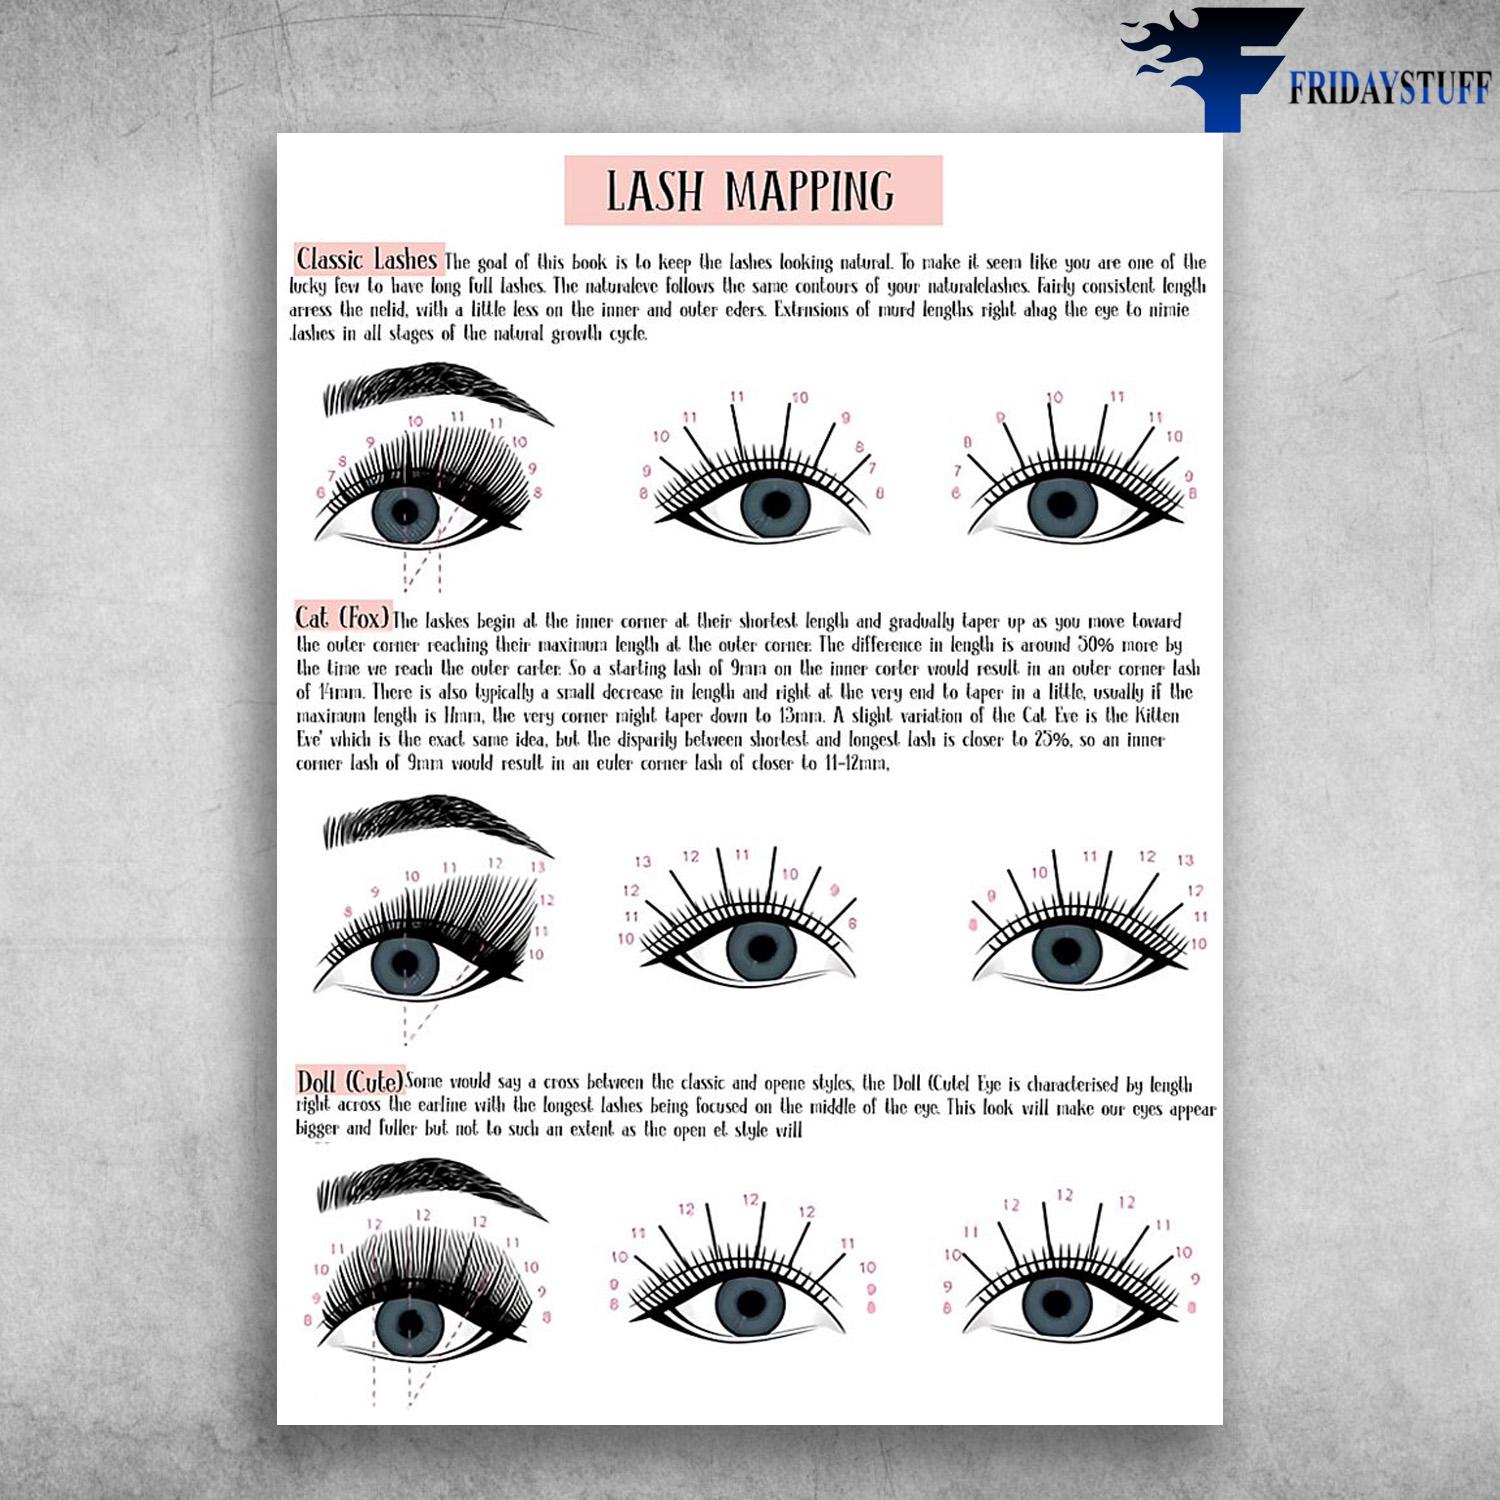
Classic lash set mapping is the process of planning and designing the placement of individual lash extensions on a client's natural lashes. This technique ensures that the lashes are applied in a way that complements the client's eye shape, facial structure, and desired look. The goal of lash mapping is to create symmetry, balance, and a natural appearance while enhancing the beauty of the eyes.
The process begins with analyzing the client's eye shape and identifying key points such as the inner corner, mid-point, and outer corner of the eye. These points serve as guidelines for where to apply shorter, medium, and longer lashes. By following a well-planned lash map, lash artists can achieve consistent and professional results.
Classic lash set mapping is particularly important for creating customized looks. For example, clients with round eyes may benefit from a cat-eye effect to elongate the eyes, while clients with hooded eyes may require a more open and lifted look. Understanding these nuances is essential for delivering personalized and satisfying results.
Why Lash Mapping Matters
Lash mapping is the foundation of a successful lash application process. Without a proper map, the lashes may look uneven, unnatural, or disproportionate. This can lead to dissatisfied clients and damage to your reputation as a lash artist. Here are some reasons why lash mapping is crucial:
- Enhances Eye Shape: Lash mapping helps accentuate the client's natural eye shape, making the eyes appear larger, brighter, and more defined.
- Creates Symmetry: By mapping out the lash placement, you can ensure that both eyes have a balanced and symmetrical look.
- Customization: Every client has unique features, and lash mapping allows you to tailor the lash set to their specific needs and preferences.
- Prevents Errors: A well-planned lash map serves as a guide, reducing the risk of mistakes during the application process.
Tools and Products for Lash Mapping
To create an effective lash map, you'll need the right tools and products. Here are some essentials:
- Lash Mapping Tape: This adhesive tape is used to mark the key points on the client's eyelids.
- Lash Glue: A high-quality lash adhesive is crucial for securing the extensions in place.
- Lash Tweezers: Precision tweezers are necessary for isolating and applying individual lashes.
- Lash Extensions: Choose lashes in various lengths and curls to create a customized look.
- Lash Mapping Guide: Some lash artists use pre-printed lash mapping guides for consistency.
Step-by-Step Lash Mapping Process
Follow these steps to create a flawless lash map:
Read also:Discover The Ultimate Guide To S 4u Hub A Comprehensive Resource
Step 1: Analyze the Eye Shape
Begin by examining the client's eye shape. Common eye shapes include almond, round, hooded, and monolid. Understanding the eye shape will help you determine the best lash style to enhance the client's features.
Step 2: Mark the Key Points
Use lash mapping tape to mark the inner corner, mid-point, and outer corner of the eye. These points will serve as guidelines for where to apply shorter, medium, and longer lashes.
Step 3: Apply Lashes According to the Map
Start applying lashes based on the lash map. Use shorter lashes near the inner corner, medium lashes in the middle, and longer lashes toward the outer corner. This creates a natural gradient effect.
Tips for Beginners
If you're new to classic lash set mapping, here are some tips to help you get started:
- Practice Makes Perfect: Spend time practicing on mannequin heads or models to refine your skills.
- Invest in Quality Tools: High-quality tools and products will make the process easier and more efficient.
- Take a Course: Consider enrolling in a lash extension course to learn from experienced professionals.
- Be Patient: Lash mapping requires precision, so take your time and avoid rushing the process.
Advanced Techniques for Professionals
For experienced lash artists, here are some advanced techniques to elevate your lash mapping skills:
- Layering: Experiment with layering different lengths and curls to create depth and dimension.
- Custom Designs: Offer custom lash designs tailored to the client's preferences and facial features.
- Hybrid Lashes: Combine classic and volume lashes for a unique and textured look.
Common Mistakes to Avoid
Here are some common mistakes to watch out for when performing classic lash set mapping:
- Skipping the Mapping Process: Always create a lash map before applying extensions.
- Using the Wrong Lengths: Ensure the lash lengths are appropriate for the client's eye shape.
- Overloading the Lashes: Avoid applying too many lashes, as this can weigh down the natural lashes.
Maintaining Lash Extensions
Proper maintenance is essential for prolonging the lifespan of lash extensions. Here are some tips:
- Avoid Water for 24 Hours: Keep the lashes dry for the first 24 hours after application.
- Use Oil-Free Products: Oil-based products can weaken the lash adhesive.
- Brush Daily: Use a clean spoolie brush to keep the lashes neat and tangle-free.
Conclusion
Classic lash set mapping is a vital skill for any lash artist, whether you're a beginner or a seasoned professional. By mastering this technique, you can create stunning, customized lash sets that enhance your clients' natural beauty. Remember to analyze the eye shape, use high-quality tools, and follow a systematic approach to ensure consistent and professional results.
If you found this guide helpful, feel free to share it with fellow lash artists or leave a comment below with your thoughts. For more tips and tutorials, explore our other articles on lash artistry and beauty techniques. Happy lashing!